

We’ve all heard we need to adjust the thermostats when we are gone to not waste gas or electricity, but what about the water? Sure, take shorter showers or baths to save, but what about a constantly running toilet? Did you realise that a leaky toilet could waste as much as a few thousand gallons of water each month? That can add up to as much as $50 extra on your water bill! Here we will show you how to fix a running toilet valve.
The scoop on valves
So, what is a valve, anyways? A valve is a device that controls, directs, or regulates the flow of liquid or air. To better apply this to matters of your home, it is a “switch” for your water. When you turn the cold or hot water knobs in the sink tap or tub or turn the water on to your garden hose, you are opening and closing a valve to allow the water to flow. Valves are very simple devices. They control the flow of water by means of a ball or a gate. These ball or gate valves can go from completely closed to gradually opening up to the full size of the inside of the pipe that it is connected on, and the amount of this opening is the amount of water that the valve will allow getting through.
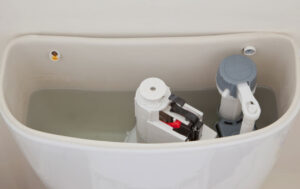
Some valves, however, are made to be either open or closed – either the water will flow through it or it won’t. Inside your toilet tank, you will find 2 valves – a float valve and a flapper. As long as these two valves are doing their jobs, the flushing part of the toilet should be working just fine.
How does a toilet work?
 All we really need to know is that if I push down on the handle, the toilet needs to flush (here’s what to do if your toilet won’t flush). Simple enough, right? So what happens if the water doesn’t stop running, or if there is no water at all? The easiest way to fix anything is to understand how something works, or at least is supposed to work. Inside the toilet tank, you will see a conglomerate of stuff that doesn’t look like it makes much sense. However, understanding what each part does will help you to understand how it all works.
At the bottom outside of the tank, normally located on the left-hand side you will see a water line coming from the wall and connecting to the bottom of the tank. If you remove the cover from the top of the tank and look in that area from the inside, you will see a tower looking thing with a “bubble” that rides up and down it when the water level changes. This bubble is the float (also called the fill valve), which turns the water on and off to automatically fill the tank. When you pull the handle to flush, you will see on the inside that there is a lever connected with a chain on the end that pulls up the flapper. When the flapper is pulled open, it releases the water from the tank and into the bowl.
Two things happen when the water is emptied – the float drops down which opens the valve to refill the tank, and the flapper falls back down to close the opening to the bowl back up. As the water fills back in the tank, the float rides back up and closes the valve to stop the tank from filling. Now it’s ready to repeat the process all over again.
The Quick Fix
If you hear the toilet running periodically or constantly even though no one has flushed the toilet, the problem is most likely going to be narrowed down to one of these two valves. To decide which one is the culprit, you need to remove the lid and look inside. If you see water running into the overflow tube (the tube sticking up next to the flapper), then the float is either jammed or needs replacement. If the water level is low and perhaps you can tell if the water is making its way to the bowl, then the issue is with the flapper.
9 times out of 10 the problem will be the flapper. The first thing is to see if the chain is tangled in a way that it is keeping the flapper from seating properly on the opening. If the chain is good and the flapper looks like it is OK, it probably isn’t. Flappers over a period of time tend to degrade a bit making it more pliable, which can cause it to seat unevenly on the opening. This is a very easy replacement that requires only a pair of pliers to complete.
To replace the flapper, first, turn the valve off to the water line that feeds the tank by turning it clockwise until it stops turning. Use the handle to flush the toilet as you normally would to empty the tank. Once the tank is empty (there will still be a bit of water at the bottom), remove the chain from the flapper, then pull the two ‘arms’ of the back of the flapper away from the pins to remove it. These pins act as pivot and attachment points that keep the flapper in place. To install the new flapper, simply repeat the steps of removal, and voila! You have fixed your running toilet!
Tools needed:
- Pliers
Replace the Fill Valve
 In the case the flapper is not the only problem, replacing the entire assembly is in order. Thankfully, as almost every toilet found in homes are made the same (except for some “boutique” toilets like bidets), finding a toilet repair kit should not be hard to do and can be found in almost every local hardware store or online.
To begin this project, turn the water supply off and empty the tank just as in the section above. It would be wise to have a large bowl to put under the water line connection at this point. Remove the water line from the bottom of the tank. Remove the nut from the bottom of the float valve assembly (located underneath the tank). Make sure the tube connecting from the fill valve and the overflow tube is removed. In reverse order, install the new fill valve assembly and reconnect the water supply. Look to make sure the tube from the fill valve is connected back to the overflow tube. If you are replacing the flapper with the valve assembly, then perform the steps above at this point.
After the water is turned back on and the tank fills up, check the water level. If it is too high or too low, you can adjust this by adjusting the float. If the level needs to be higher, then adjust the float up, and if the level needs to be lower, then adjust the float down.
Tools needed:
- Adjustable wrench
You’re Good to Go!

Congratulations! You have fixed your running toilet! If you don’t have the tools needed, here’s a basic home tool kit recommended as a minimum for your home. Please feel free to leave a comment below and tell us what you think or what how-to’s you would like to see. Thanks!
Jake is a tool guy – think Tim Allen from Home Improvement but with a much drier sense of humor. He lives in the great state of Ohio and plays the guitar on his downtime. He also spends his time writing on all things tools and DIY-related as this is his passion.
Related posts:
 How To Replace A Toilet Cistern The Easy Way!
  Best Toilet Augers For Tough Clogs (2023 Review)
  A Guide To Finding Water Leaks In Your Home
  How To Clean An Electric Chainsaw: A Step-by-Step Guide
  Why Do Super Glue Adhesives Bond to the Skin?
  The Different Concrete Leveling Tools You Need For Concreting